1
/
of
6
www.ChineseStandard.us -- Field Test Asia Pte. Ltd.
GB/T 8721-2019 English PDF (GB/T8721-2019)
GB/T 8721-2019 English PDF (GB/T8721-2019)
Regular price
$150.00
Regular price
Sale price
$150.00
Unit price
/
per
Shipping calculated at checkout.
Couldn't load pickup availability
GB/T 8721-2019: The test method for tensile strength of carbon materials
Delivery: 9 seconds. Download (& Email) true-PDF + Invoice.
Get Quotation: Click GB/T 8721-2019 (Self-service in 1-minute)
Historical versions (Master-website): GB/T 8721-2019
Preview True-PDF (Reload/Scroll-down if blank)
GB T 8721-2019
NATIONAL STANDARD OF THE
PEOPLE’S REPUBLIC OF CHINA
ICS 29.050
Q 50
Replacing GBT 8721-2009
The test method for tensile strength of carbon
materials
ISSUED ON: JUNE 04, 2019
IMPLEMENTED ON: MAY 01, 2020
Issued by: State Administration for Market Regulation;
Standardization Administration of the People’s Republic of
China.
Table of Contents
Foreword ... 3
1 Scope ... 5
2 Normative references ... 5
3 Principle ... 5
4 Instruments and apparatuses ... 5
5 Sample ... 6
6 Test steps ... 7
7 Result calculation ... 7
8 Test report ... 8
Appendix A (Informative) Test fixture ... 9
References ... 14
Foreword
This Standard was drafted in accordance with the rules given in GB/T 1.1-2009.
This Standard replaces GB/T 8721-2009, Method for the determination of
tensile strength of carbonaceous materials; compared with GB/T 8721-2009,
the major technical changes of this Standard are as follows:
-- Modify the scope description (see Chapter 1, Chapter 1 of version 2009);
-- Modify the technical requirements of the material testing machine (see 4.1,
4.1 of version 2009);
-- Delete the standard fixture and replace with the test fixture (see 4.2, 4.2 of
version 2009);
-- Add technical requirements for vernier calipers (see 4.3);
-- Delete the sample quantity requirement (see 5.2 of version 2009);
-- Modify the sample processing method (see 5.2, 5.3 of version 2009);
-- Add appearance requirements for processed samples (see 5.3);
-- Delete the requirement that “machining accuracy is implemented in
accordance with the provisions of GB/T 1427” (see 5.4 of version 2009);
-- Add technical requirements of “ensuring alignment of the centerlines of all
joints” in the test (see 6.3);
-- Add Appendix A Test fixture (see Appendix A).
This Standard was proposed by China Iron and Steel Industry Association.
This Standard shall be under the jurisdiction of National Technical Committee
183 on Iron and Steel of Standardization Administration of China (SAC/TC 183).
The drafting organizations of this Standard: Sinosteel Advanced Materials
(Zhejiang) Co., Ltd., Shandong Basan Graphite New Material Plant, Kaifeng
Carbon Co., Ltd China PingMei ShenMa Group, Changzhou Xinneng Material
Inspection and Testing Co., Ltd., Sinosteel Anshan Research Institute of
Thermo-energy Co., Ltd., China Metallurgical Information and Standardization
Institute.
The drafters of this Standard: Yang Hui, Xu Hanchun, Mao Yuzhen, Tang
Yonggui, Wan Jianmin, Liu Bingqiang, Xu Jianping, Wang Wei, Zheng Jingxu,
Du Aifang, Wang Zhiqiang.
The test method for tensile strength of carbon
materials
1 Scope
This Standard specifies the determination principle, instruments and
apparatuses, samples, test steps and result calculation for tensile strength of
carbon materials.
This Standard applies to the determination of tensile strength of carbon
materials at room temperature.
2 Normative references
The following documents are indispensable for the application of this document.
For dated references, only the dated version applies to this document. For
undated references, the latest edition (including all amendments) applies to this
document.
GB/T 1427, Sample method of carbon material
GB/T 8170, Rules of rounding off for numerical values and expression and
judgment of limiting values
3 Principle
Tensile strength is the maximum load that a unit cross-section can withstand
when the material is subjected to a single tensile force.
4 Instruments and apparatuses
4.1 Material testing machine: the sensing accuracy is better than 1%; the
recommended maximum load of the sample is at least 10% ~ 90% of the sensor
range.
4.2 Test fixture: it consists of precision chain and other mechanical parts; the
recommended fixtures are shown in Appendix A. Other similar fixtures that
achieve the same function are also suitable.
4.3 Vernier caliper: measuring range of 0 mm ~ 200 mm, accuracy of 0.02 mm.
4.4 Micrometer: measuring range of 0 mm ~ 25 mm, accuracy of 0.01 mm.
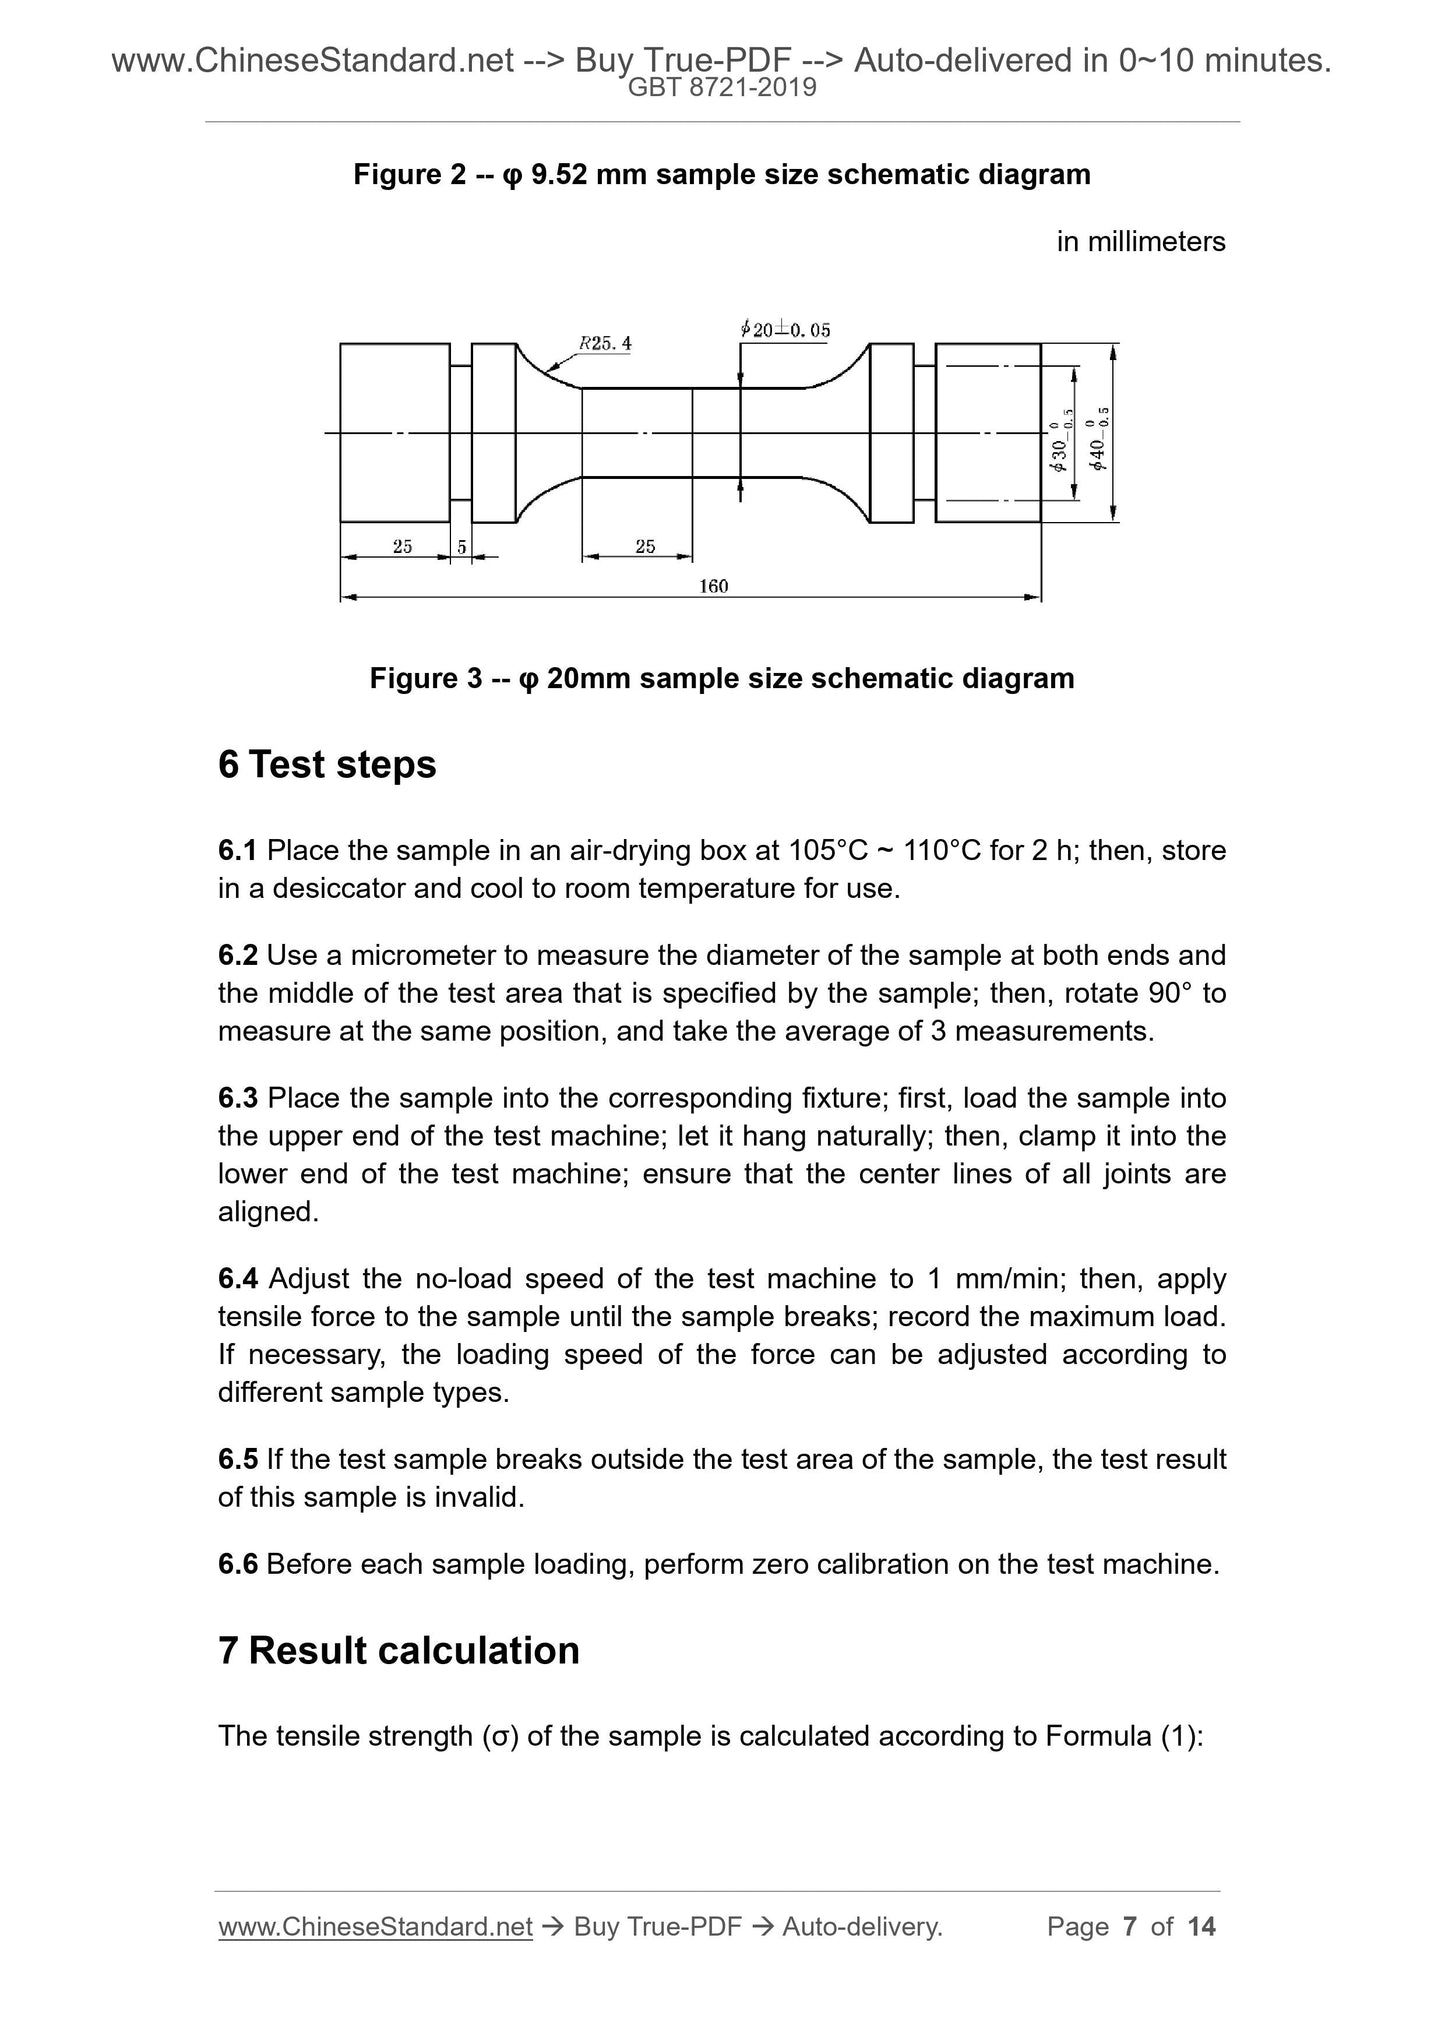
Figure 2 -- φ 9.52 mm sample size schematic diagram
in millimeters
Figure 3 -- φ 20mm sample size schematic diagram
6 Test steps
6.1 Place the sample in an air-drying box at 105°C ~ 110°C for 2 h; then, store
in a desiccator and cool to room temperature for use.
6.2 Use a micrometer to measure the diameter of the sample at both ends and
the middle of the test area that is specified by the sample; then, rotate 90° to
measure at the same position, and take the average of 3 measurements.
6.3 Place the sample into the corresponding fixture; first, load the sample into
the upper end of the test machine; let it hang naturally; then, clamp it into the
lower end of the test machine; ensure that the center lines of all joints are
aligned.
6.4 Adjust the no-load speed of the test machine to 1 mm/min; then, apply
tensile force to the sample until the sample breaks; record the maximum load.
If necessary, the loading speed of the force can be adjusted according to
different sample types.
6.5 If the test sample breaks outside the test area of the sample, the test result
of this sample is invalid.
6.6 Before each sample loading, perform zero calibration on the test machine.
7 Result calculation
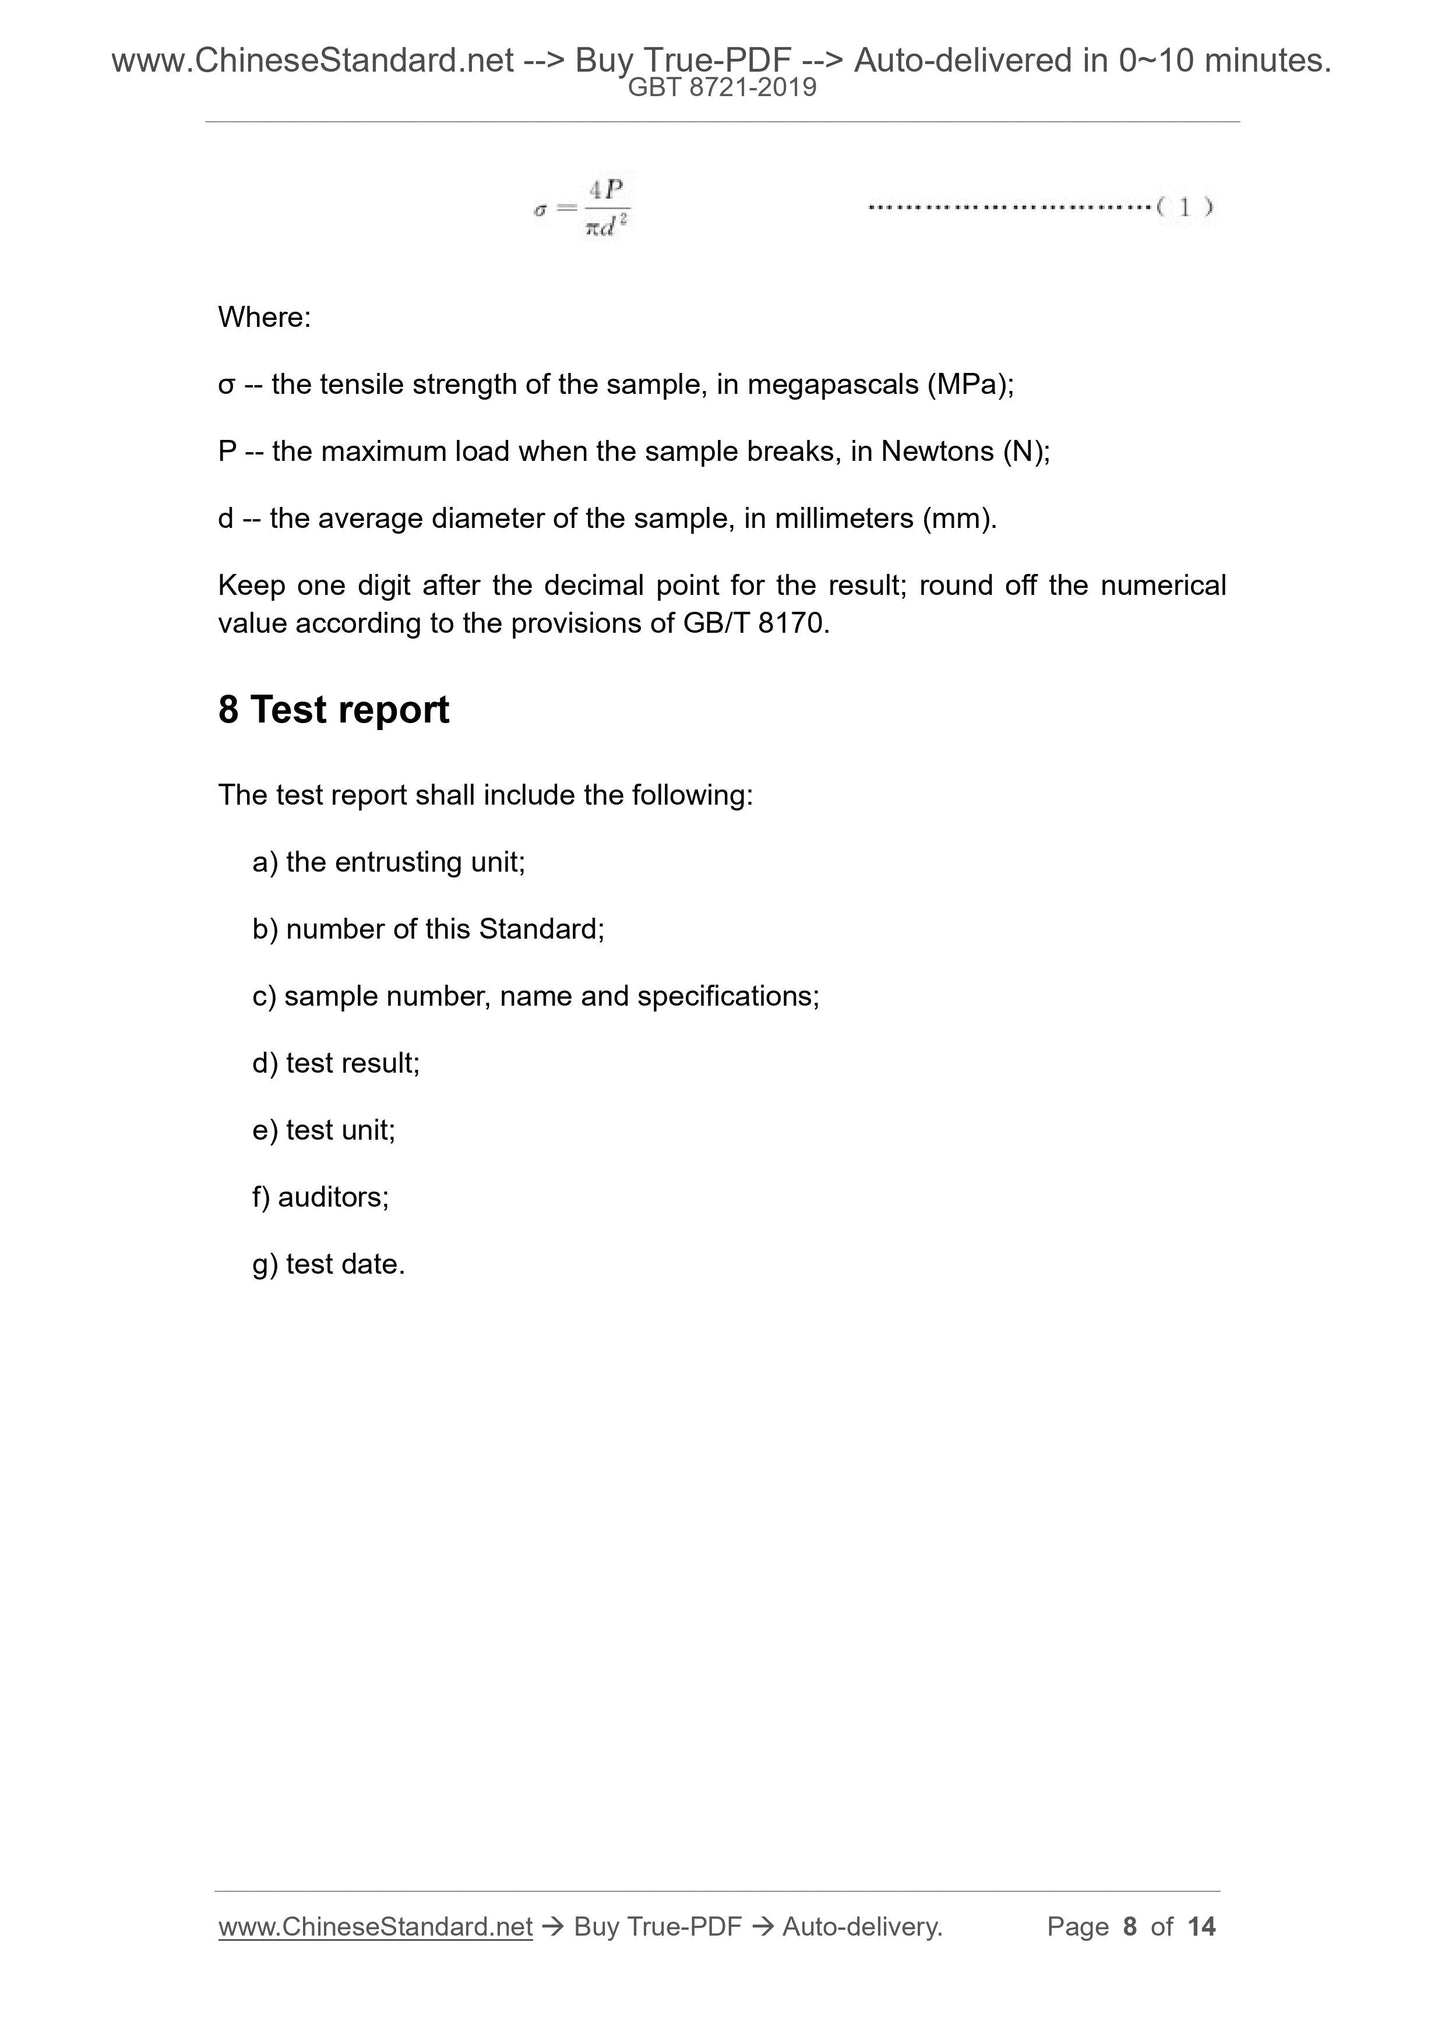
The tensile strength (σ) of the sample is calculated according to Formula (1):
Where:
σ -- the tensile strength of the sample, in megapascals (MPa);
P -- the maximum load when the sample breaks, in Newtons (N);
d -- the average diameter of the sample, in millimeters (mm).
Keep one digit after the decimal point for the result; round off the numerical
value according to the provisions of GB/T 8170.
8 Test report
The test report shall include the following:
a) the entrusting unit;
b) number of this Standard;
c) sample number, name and specifications;
d) test result;
e) test unit;
f) auditors;
g) test date.
Share
