1
/
of
8
PayPal, credit cards. Download editable-PDF and invoice in 1 second!
JB/T 6289-2005 English PDF (JBT6289-2005)
JB/T 6289-2005 English PDF (JBT6289-2005)
Regular price
$170.00 USD
Regular price
Sale price
$170.00 USD
Unit price
/
per
Shipping calculated at checkout.
Couldn't load pickup availability
Delivery: 3 seconds. Download true-PDF + Invoice.
Get QUOTATION in 1-minute: Click JB/T 6289-2005
Historical versions: JB/T 6289-2005
Preview True-PDF (Reload/Scroll if blank)
JB/T 6289-2005: Internal combustion engines - Casting aluminium pistons - Metallographic inspection
JB/T 6289-2005
JB
MECHANICAL INDUSTRY STANDARD OF
THE PEOPLE’S REPUBLIC OF CHINA
ICS 27.020
J 92
Record No.. 15603-2005
Replacing JB/T 6289-1992
Internal combustion engines – Casting aluminium
pistons - Metallographic inspection
ISSUED ON. FEBRUARY 14, 2005
IMPLEMENTED ON. AUGUST 1, 2005
Issued by. National Development and Reform Commission of the
People's Republic of China
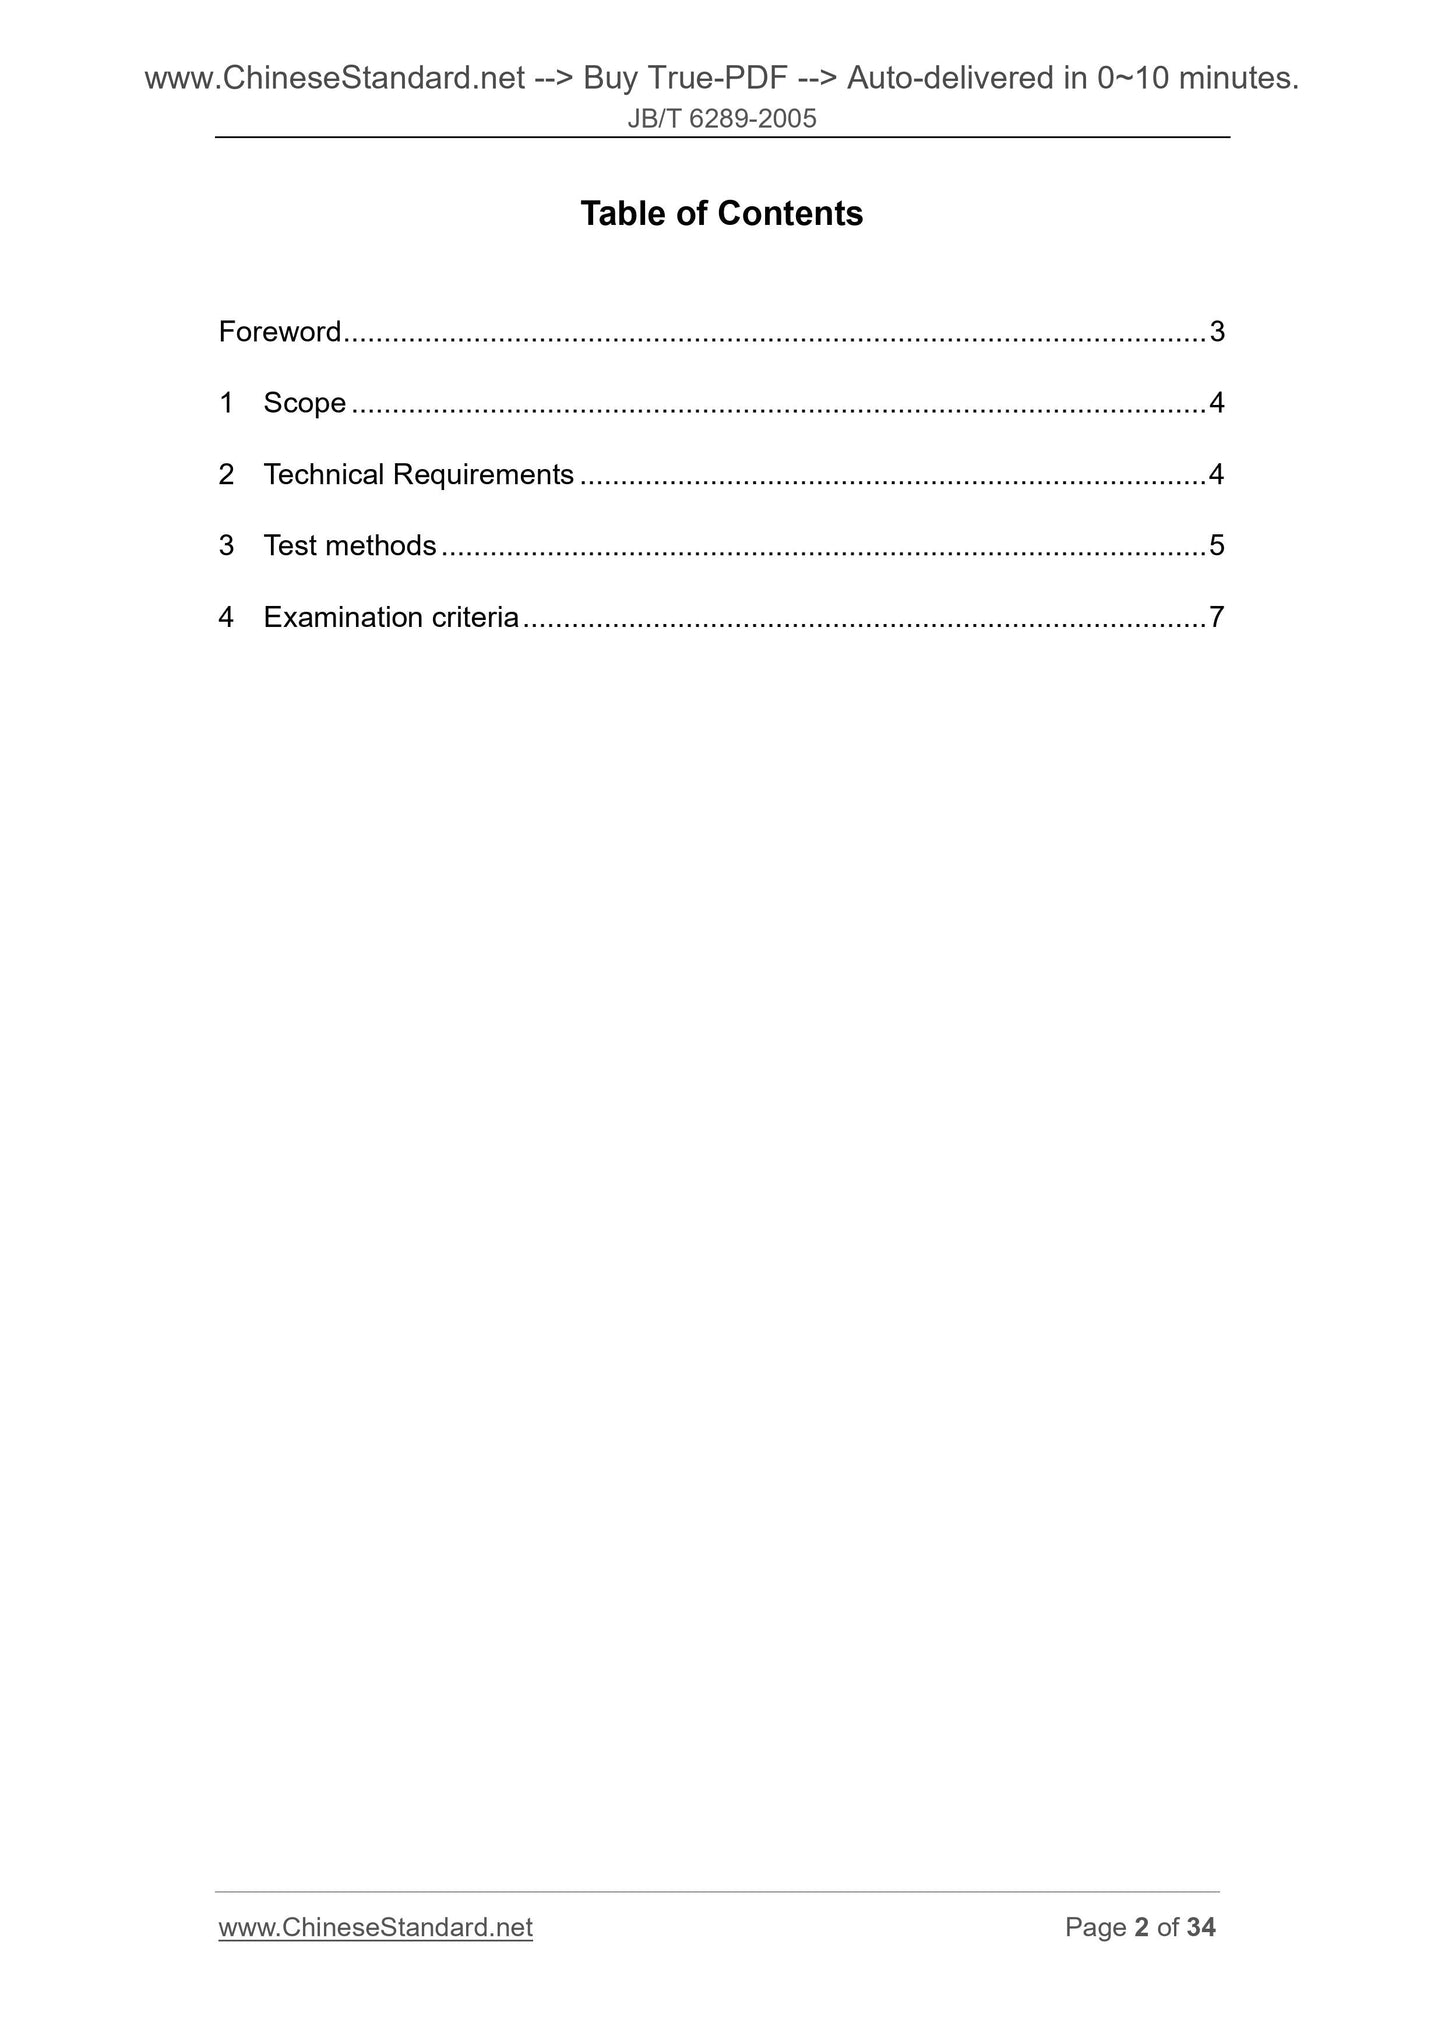
Table of Contents
Foreword ... 3
1 Scope ... 4
2 Technical Requirements ... 4
3 Test methods ... 5
4 Examination criteria ... 7
Foreword
This Standard is the revision to JB/T 6289-1992 "Internal combustion engines - Casting
aluminium pistons - Metallographic inspection". Compared with JB/T 6289-1992, the
main changes of this Standard are as follows.
- This Standard specifies the new provisions to microstructure’s sampling sites;
- Specifies the specimen size of microstructure;
- Correct the individual errors in previous standard;
- Make wording edition according to GB/T 1.1-2000’s provisions.
This Standard replaces JB/T 6289-1992.
This Standard was proposed by China Machinery Industry Federation.
This Standard internal combustion engine by the National Standardization Technical
Committee.
Drafting organizations of this Standard. Shanghai Internal Combustion Engine
Research Institute AND Shandong Binzhou Bohai Piston Co., Ltd.
Main drafters of this Standard. Li Guoen, Wang Yanliang, Zhang Guohua and Feng
Zengjian.
The historical versions replaced by this Standard are as follows.
- GB 3508-1983, JB/T 6289-1992.
Internal combustion engines – Casting aluminium
pistons - Metallographic inspection
1 Scope
This Standard specifies the metallographic-structure’s grade-level, inspection and
examination methods for internal combustion engines’ casting eutectic aluminum-
silicon alloy pistons AND aluminum-silicon-copper-magnesium (Al-Si-Cu-Mg) alloy
pistons.
This Standard is applicable to metallographic-structure inspection of internal
combustion engines’ casting eutectic aluminum-silicon alloy pistons AND Al-Si-Cu-Mg
alloy pistons, which are after heat treatment and of which the cylinder diameter is less
than or equal to 200mm.
2 Technical Requirements
2.1 Macrostructure
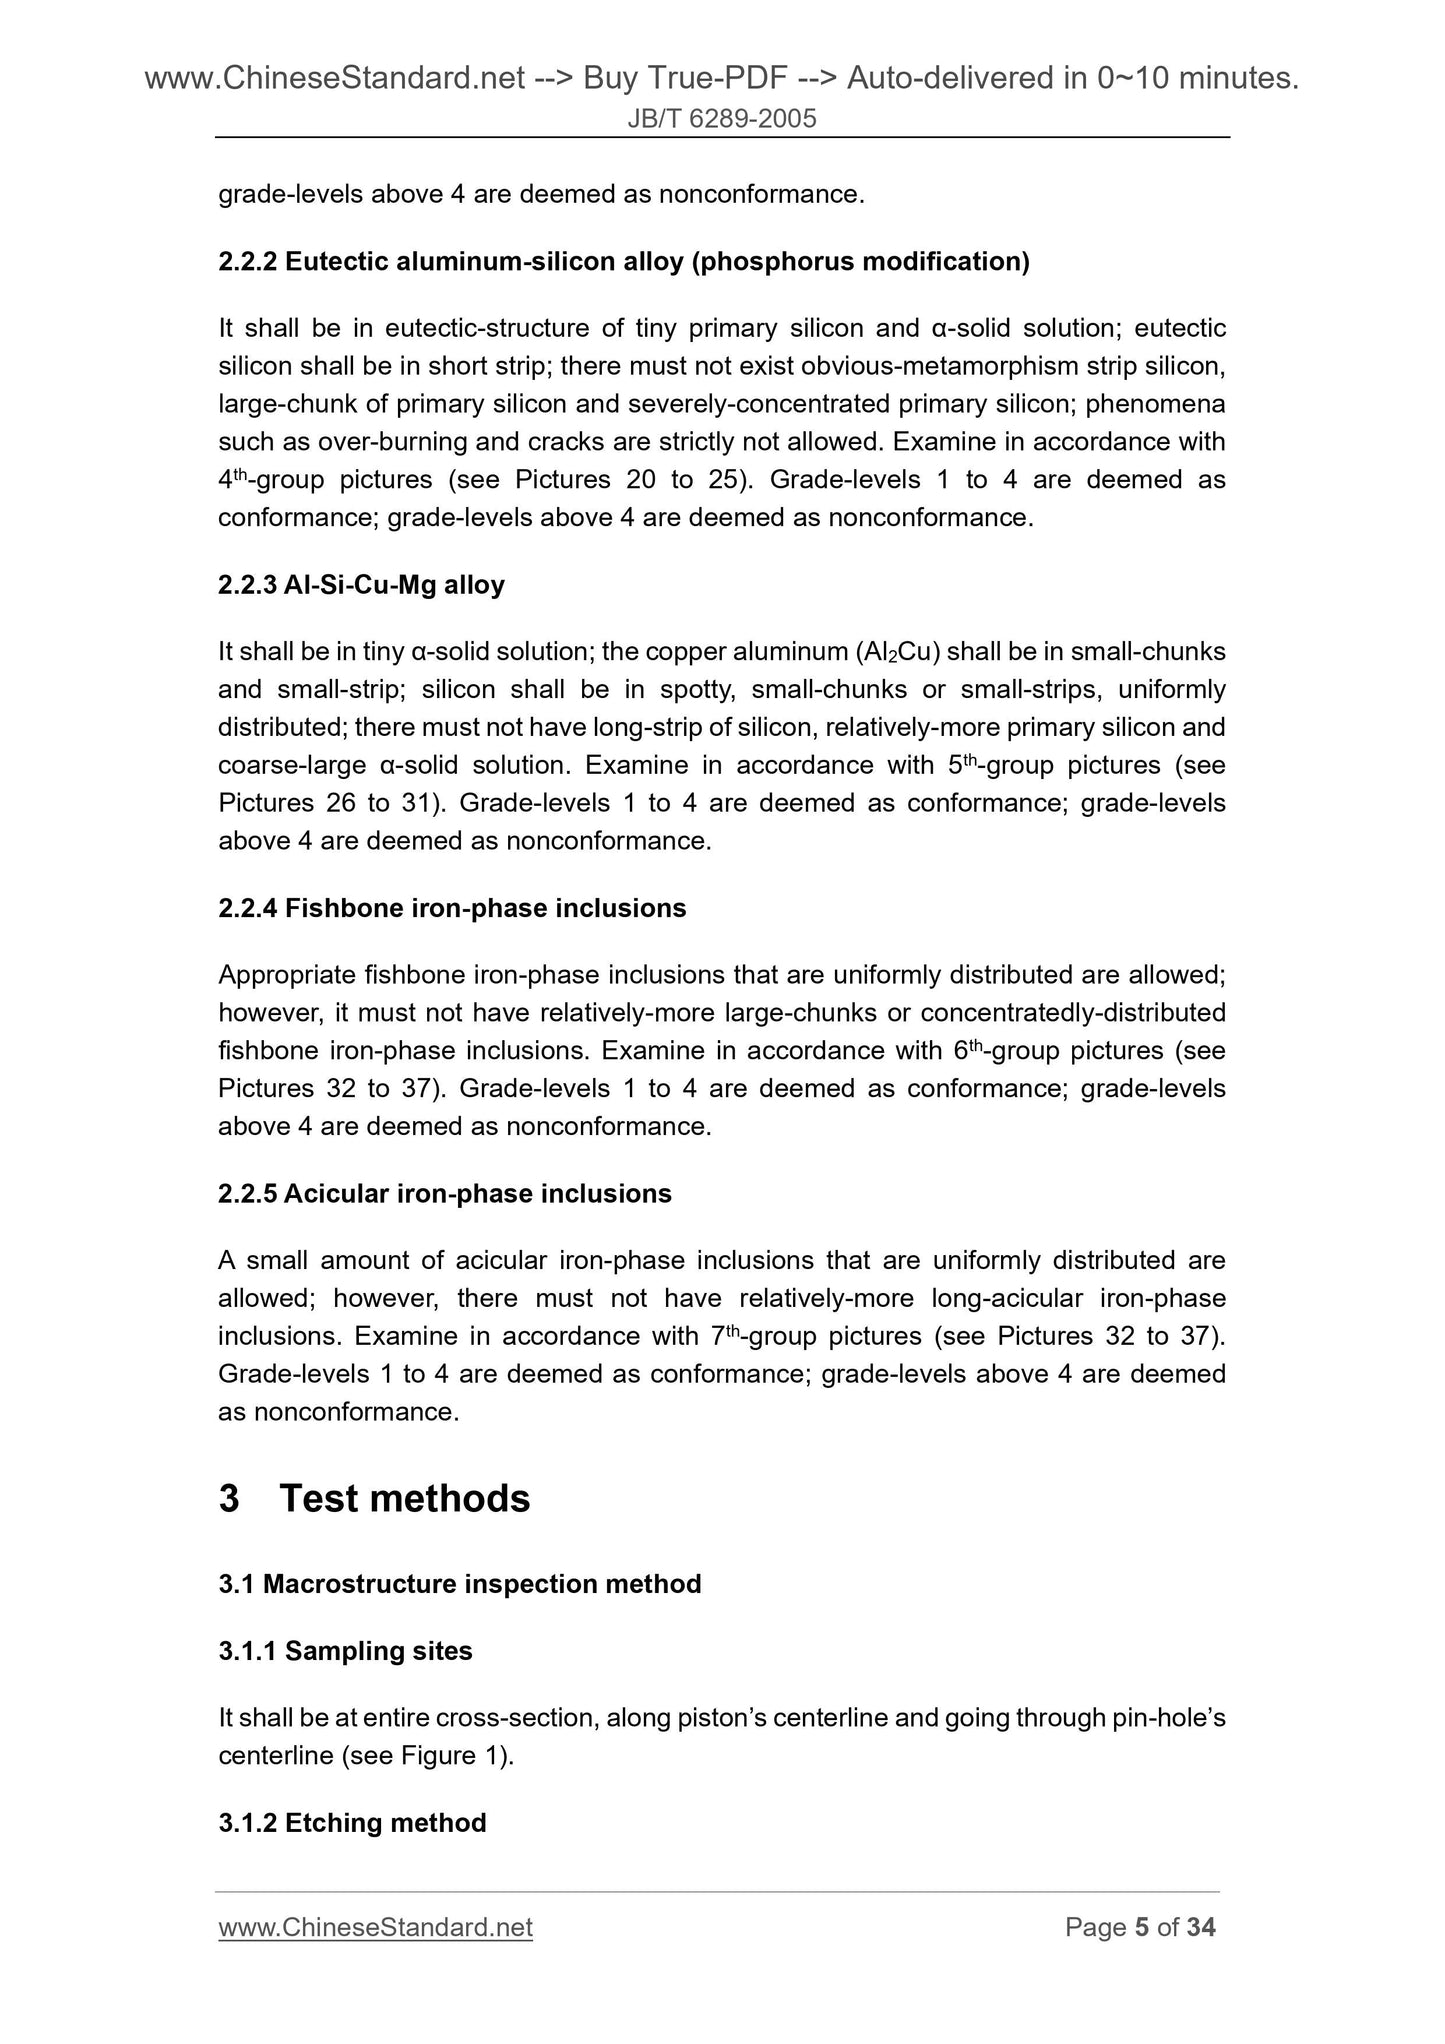
Macrostructure defects refer only to the pinholes and loose in casting aluminum-alloy
pistons pinholes and loose, collectively known as holes.
2.1.1 Dispersion holes
Examine in accordance with 1st-group pictures (see Pictures 2 to 7). Grade-levels 1 to
4 are deemed as conformance; grade-levels above 4 are deemed as nonconformance.
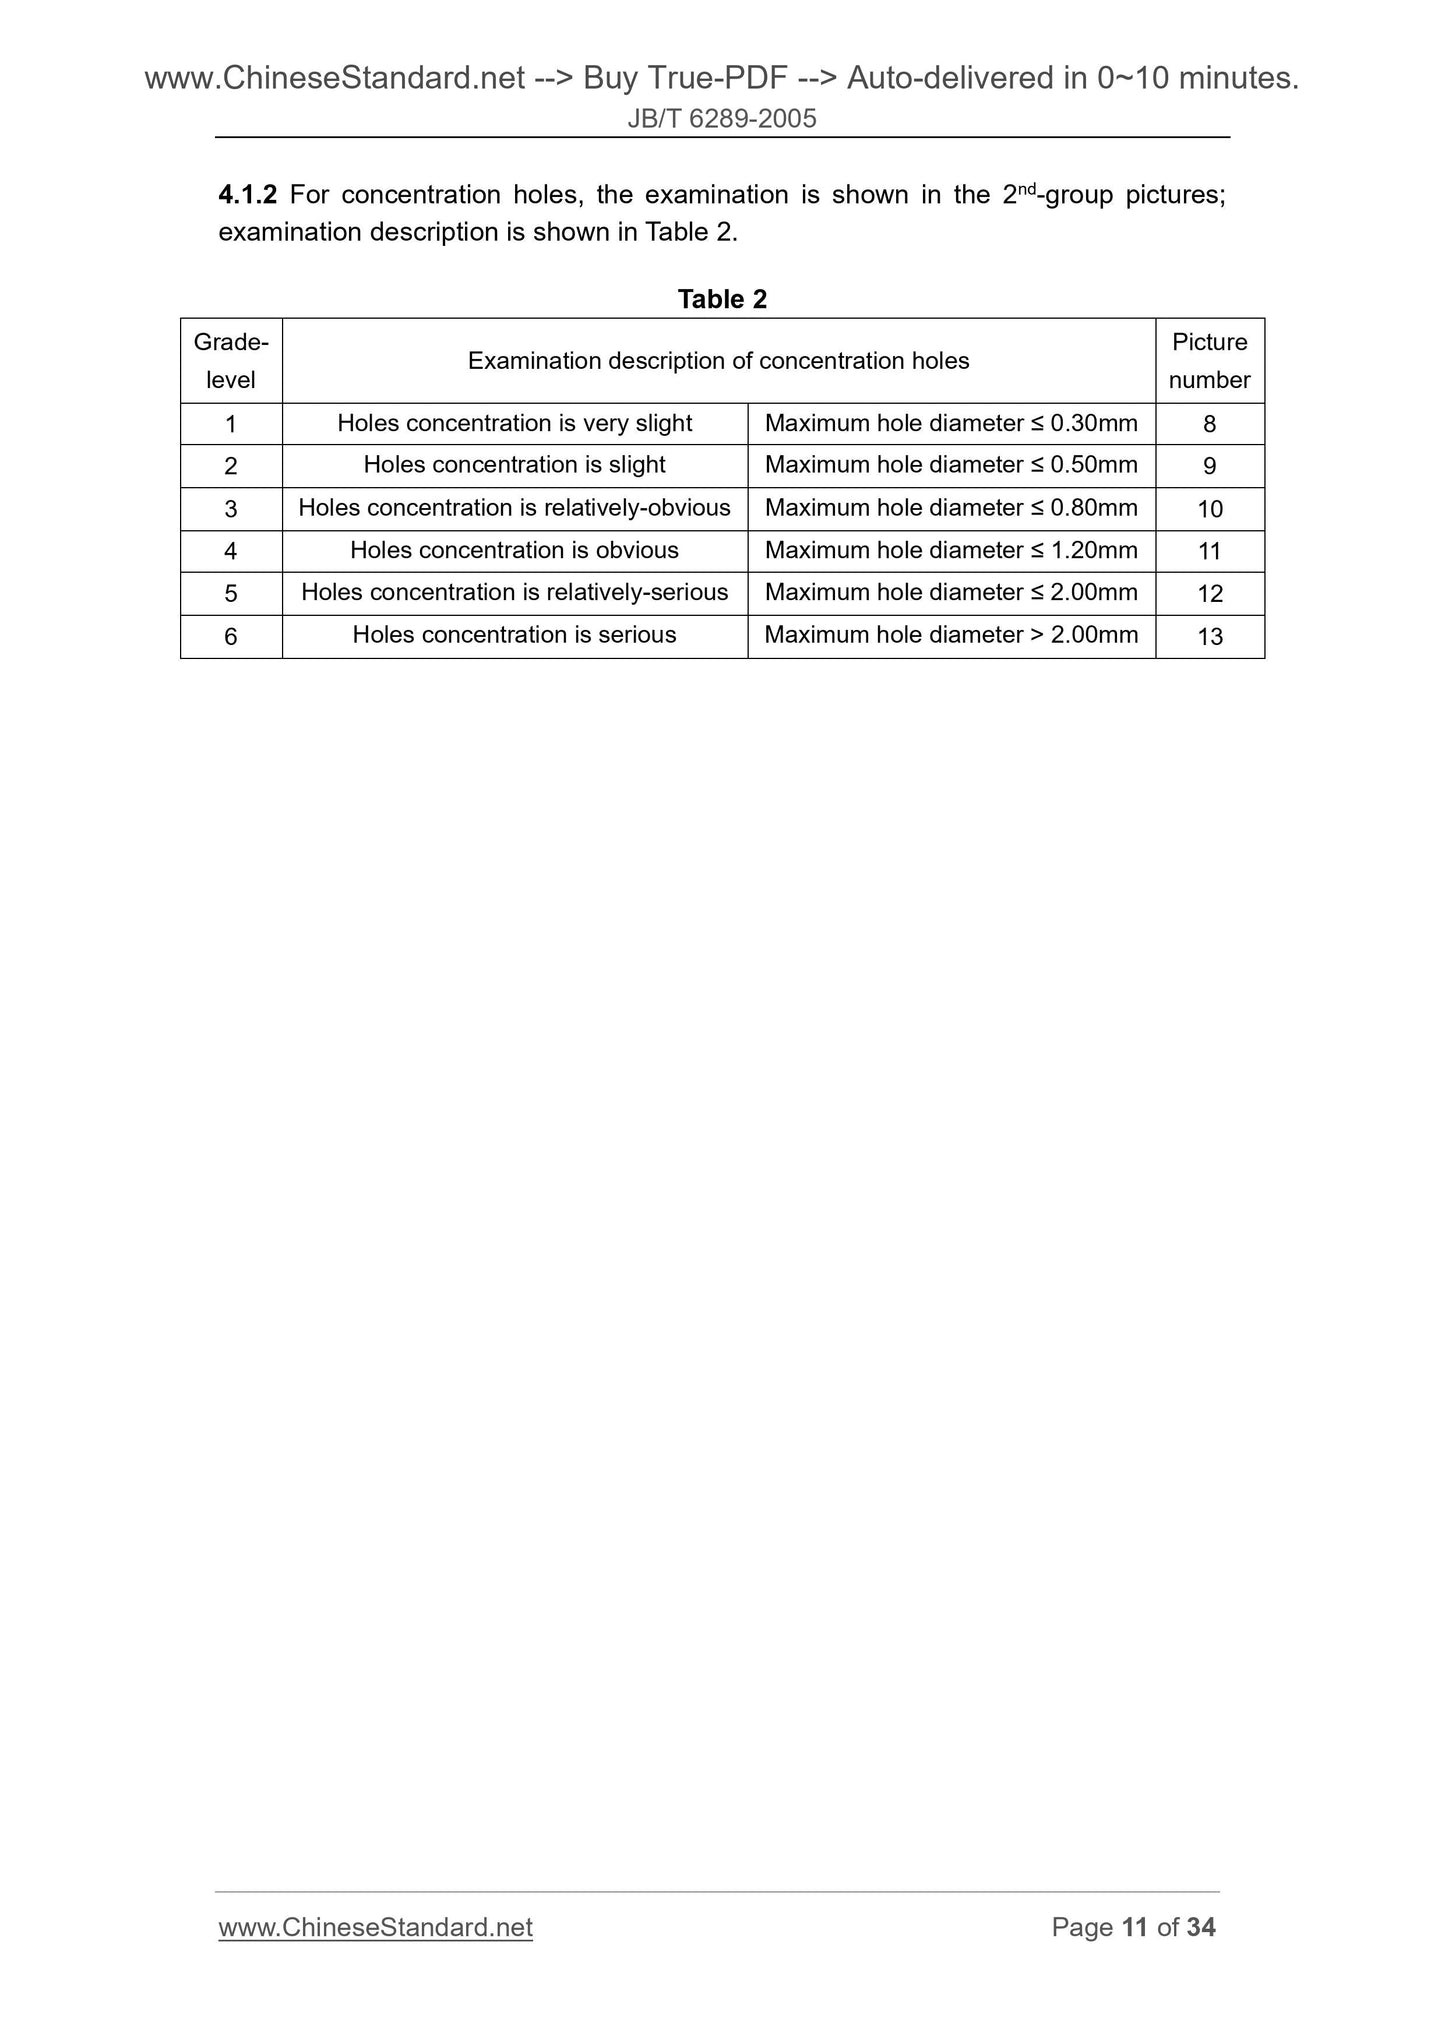
2.1.2 Concentration holes
Examine in accordance with 2nd-group pictures (see Pictures 8 to 13). Grade-levels 1
to 4 are deemed as conformance; grade-levels above 4 are deemed as
nonconformance.
2.2 Microstructure
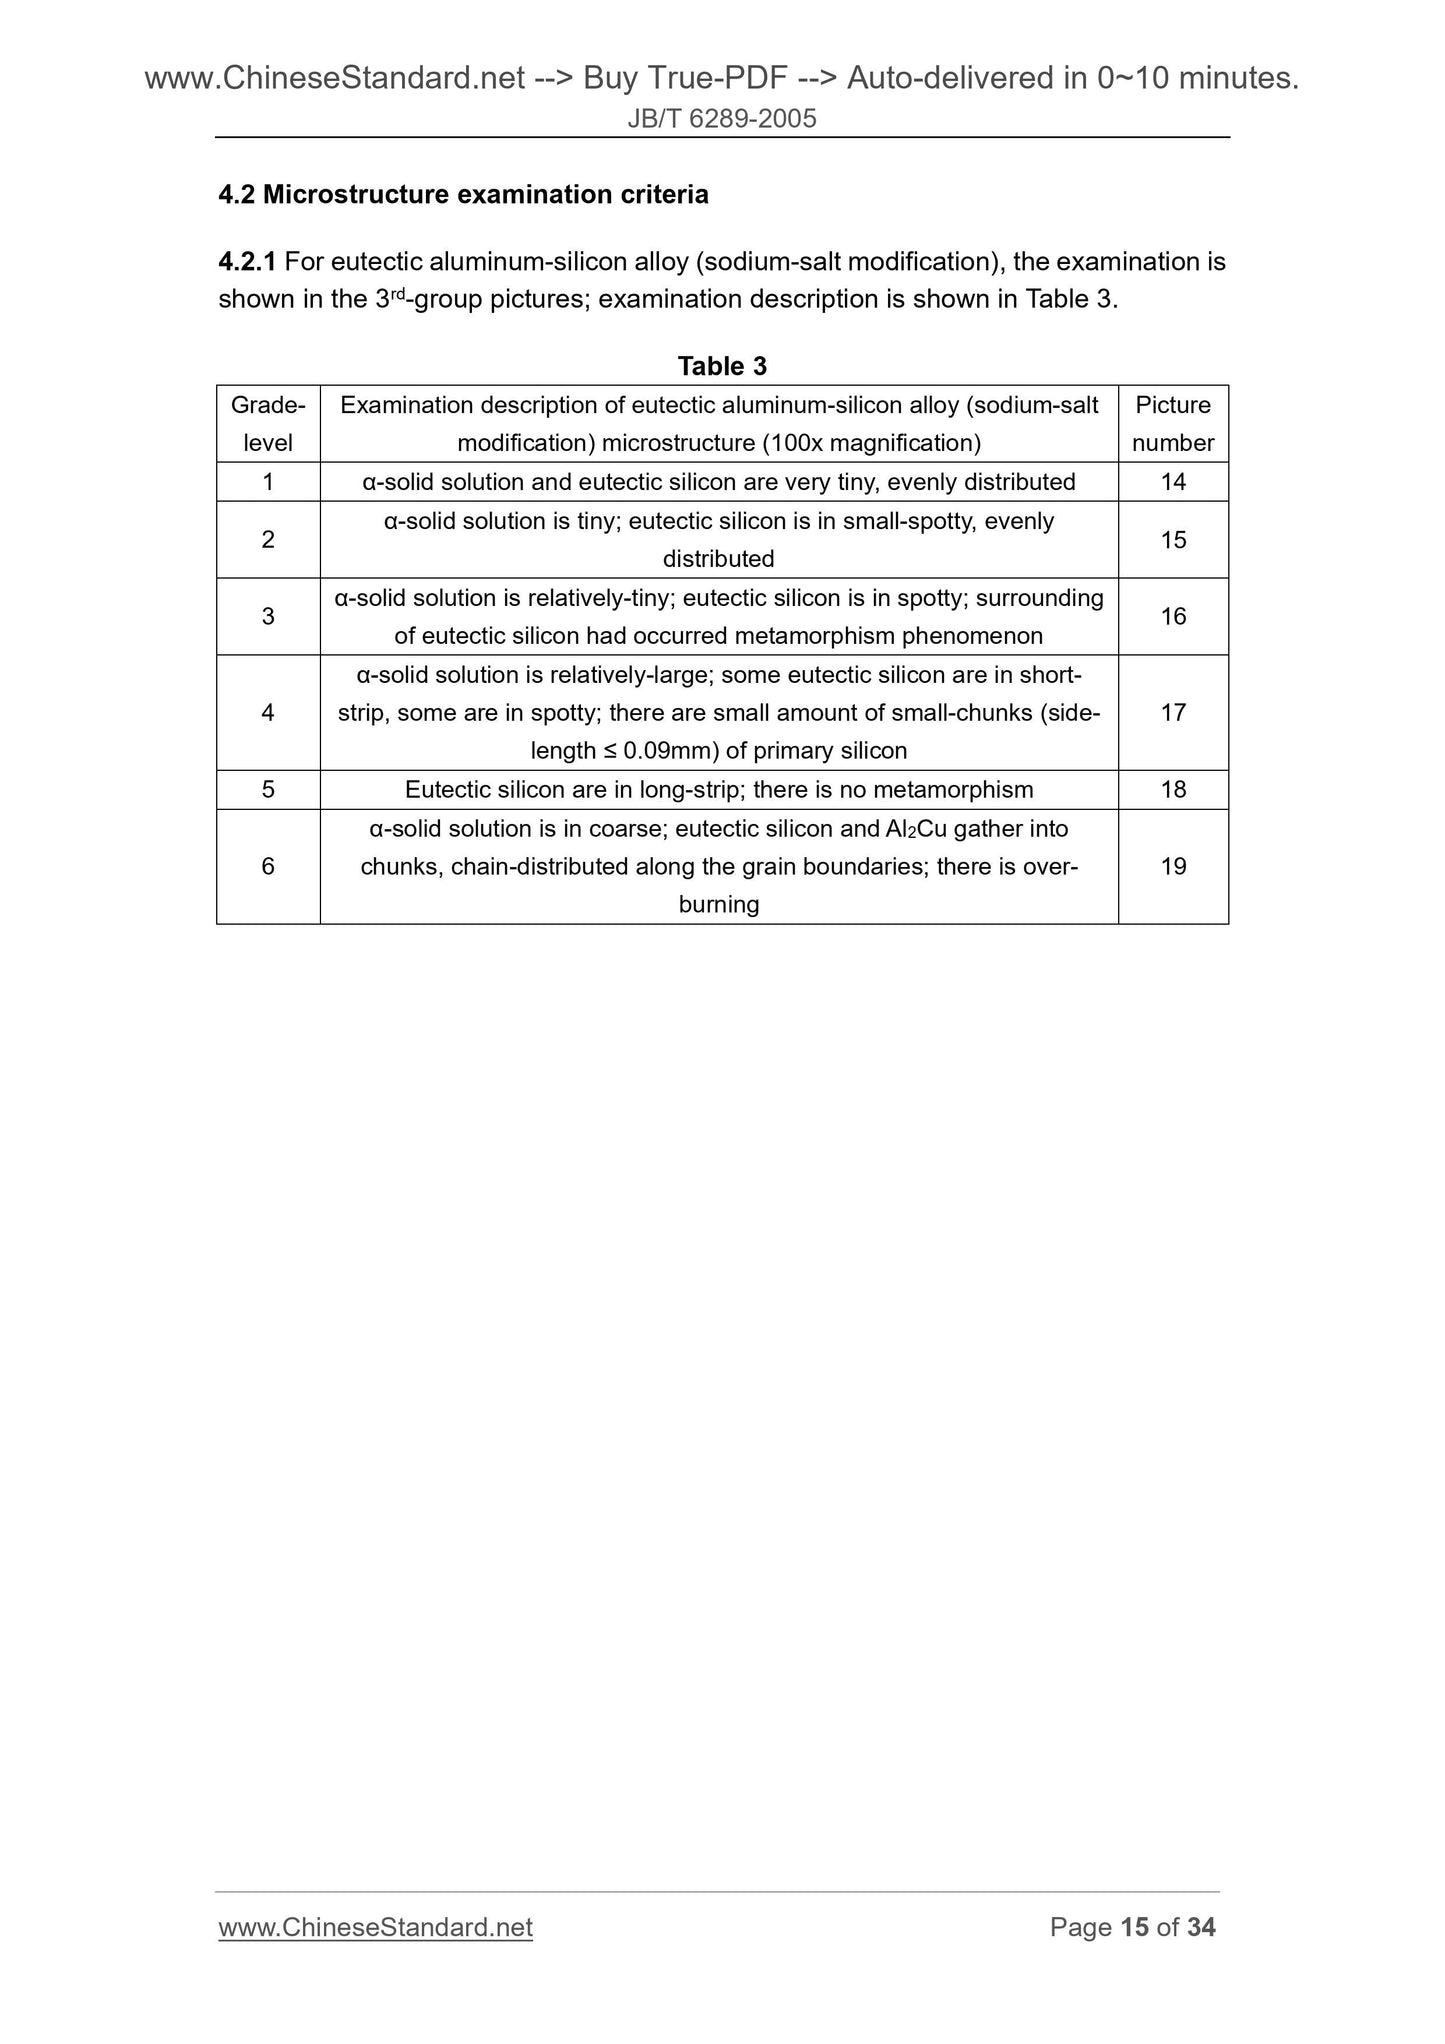
2.2.1 Eutectic aluminum-silicon alloy (sodium-salt modification)
It shall be in tiny eutectic-structure of α-solid solution and silicon; eutectic silicon shall
be in small-dots and small-strips; there must not exist obvious-metamorphism strip
silicon, large-chunk of primary silicon, or coarse α-solid solution; phenomena such as
over-burning and cracks are strictly not allowed. Examine in accordance with 3rd-group
pictures (see Pictures 14 to 19). Grade-levels 1 to 4 are deemed as conformance;
grade-levels above 4 are deemed as nonconformance.
2.2.2 Eutectic aluminum-silicon alloy (phosphorus modification)
It shall be in eutectic-structure of tiny primary silicon and α-solid solution; eutectic
silicon shall be in short strip; there must not exist obvious-metamorphism strip silicon,
large-chunk of primary silicon and severely-concentrated primary silicon; phenomena
such as over-burning and cracks are strictly not allowed. Examine in accordance with
4th-group pictures (see Pictures 20 to 25). Grade-levels 1 to 4 are deemed as
conformance; grade-levels above 4 are deemed as nonconformance.
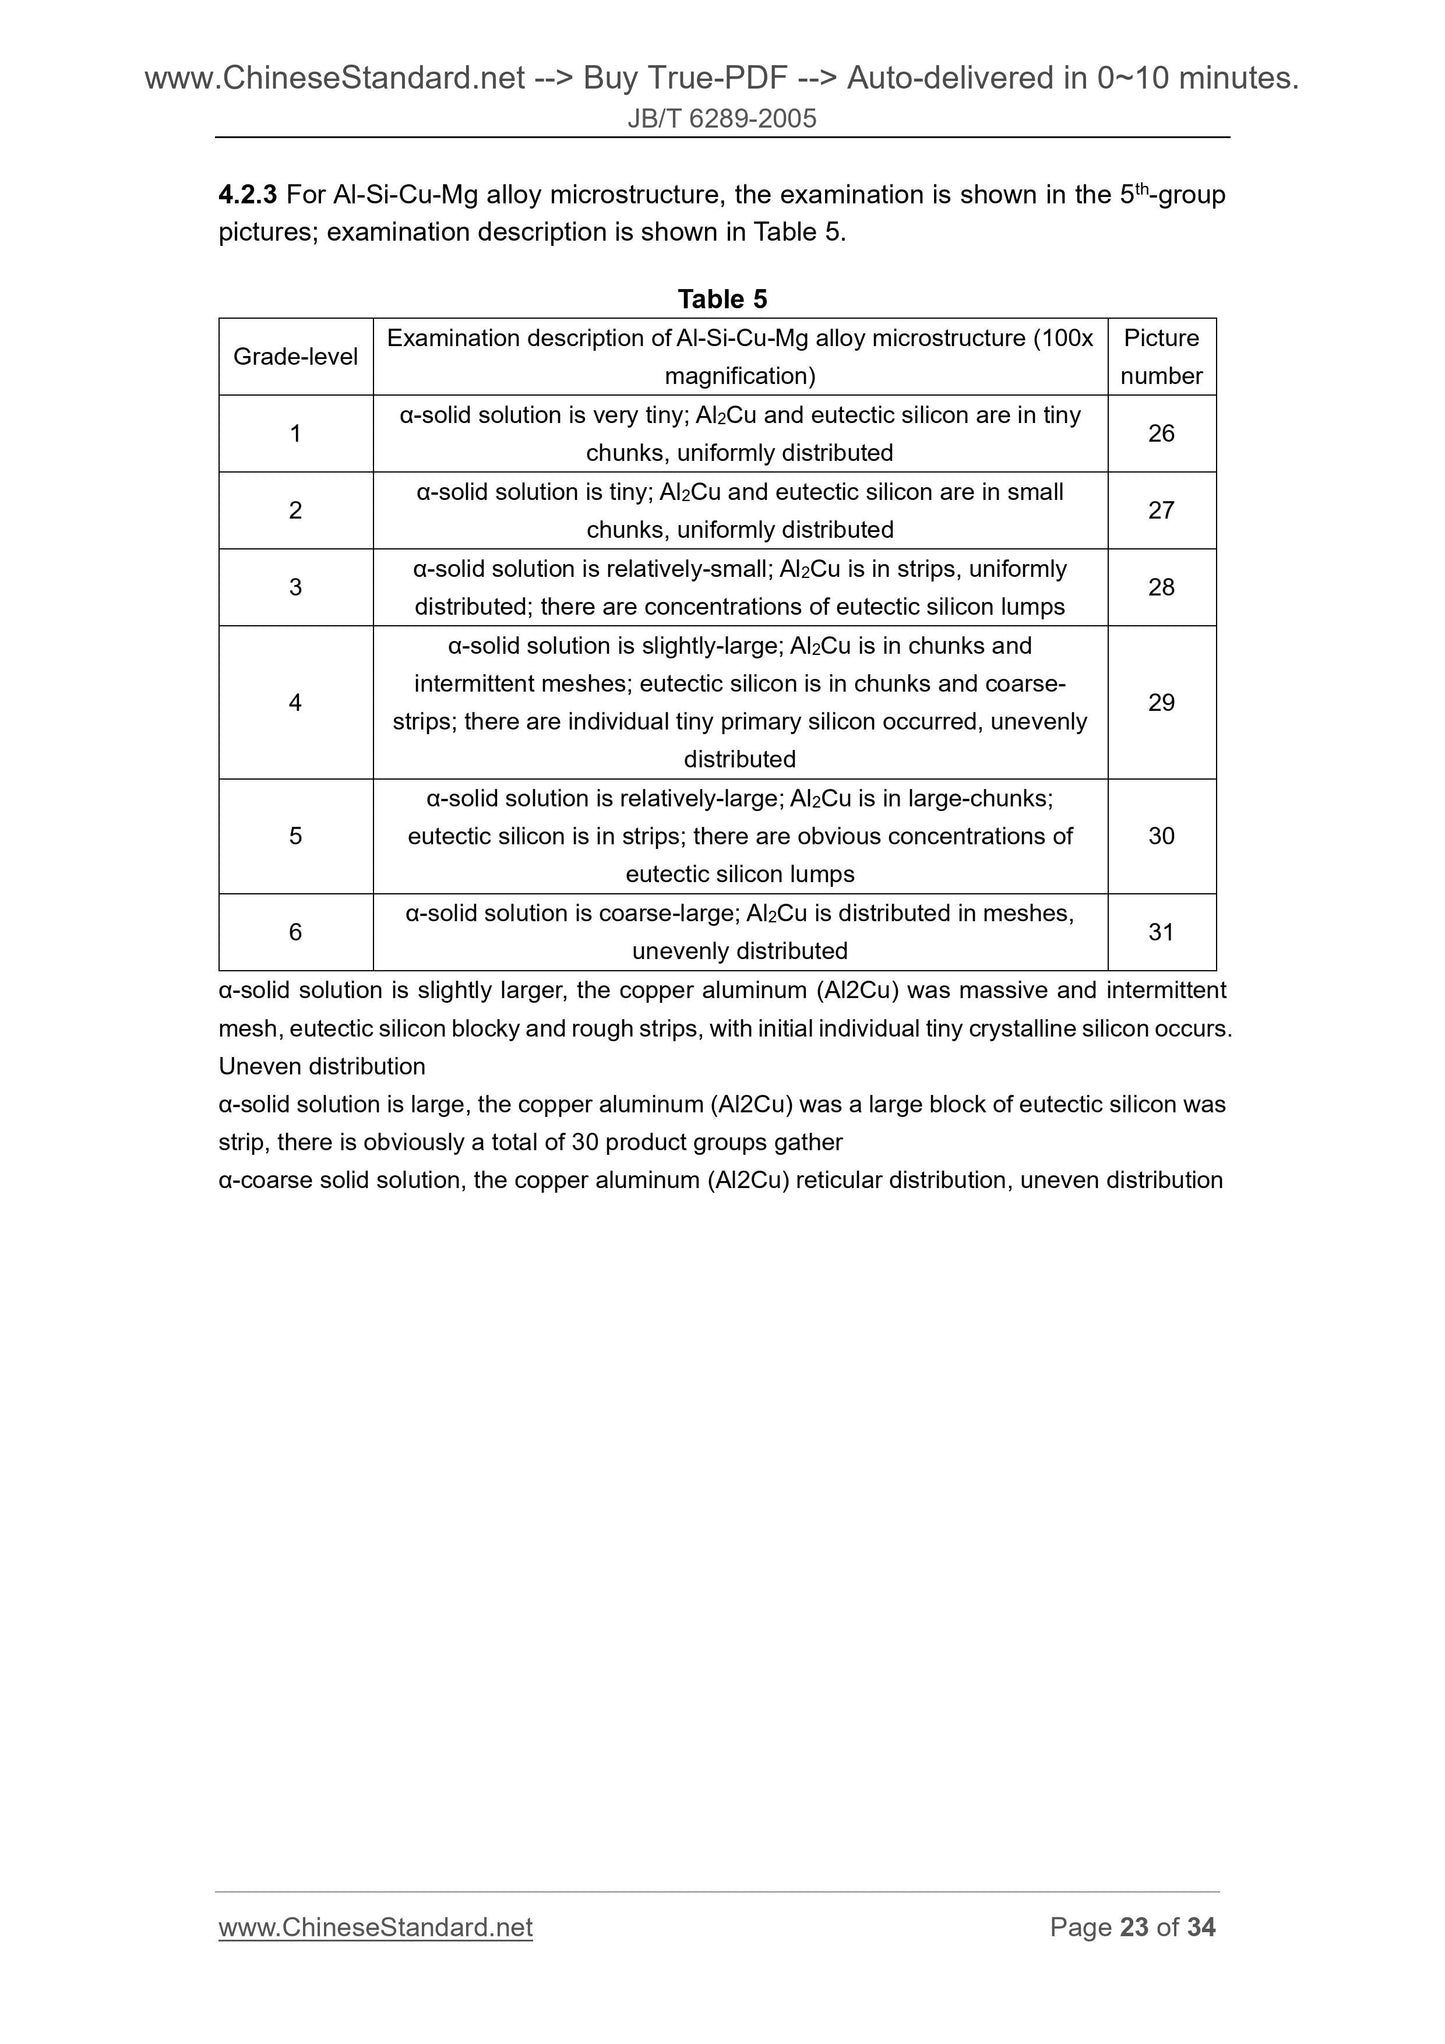
2.2.3 Al-Si-Cu-Mg alloy
It shall be in tiny α-solid solution; the copper aluminum (Al2Cu) shall be in small-chunks
and small-strip; silicon shall be in spotty, small-chunks or small-strips, uniformly
distributed; there must not have long-strip of silicon, relatively-more primary silicon and
coarse-large α-solid solution. Examine in accordance with 5th-group pictures (see
Pictures 26 to 31). Grade-levels 1 to 4 are deemed as conformance; grade-levels
above 4 are deemed as nonconformance.
2.2.4 Fishbone iron-phase inclusions
Appropriate fishbone iron-phase inclusions that are uniformly distributed are allowed;
however, it must not have relatively-more large-chunks or concentratedly-distributed
fishbone iron-phase inclusions. Examine in accordance with 6th-group pictures (see
Pictures 32 to 37). Grade-levels 1 to 4 are deemed as conformance; grade-levels
above 4 are deemed as nonconformance.
2.2.5 Acicular iron-phase inclusions
A small amount of acicular iron-phase inclusions that are uniformly distributed are
allowed; however, there must not have relatively-more long-acicular iron-phase
inclusions. Examine in accordance with 7th-group pictures (see Pictures 32 to 37).
Grade-levels 1 to 4 are deemed as conformance; grade-levels above 4 are deemed
as nonconformance.
3 Test methods
3.1 Macrostructure inspection method
3.1.1 Sampling sites
It shall be at entire cross-section, along piston’s centerline and going through pin-hole’s
centerline (see Figure 1).
3.1.2 Etching method
4.1.2 For concentration holes, the examination is shown in the 2nd-group pictures;
examination description is shown in Table 2.
Table 2
Grade-
level Examination description of concentration holes
Picture
number
1 Holes concentration is very slight Maximum hole diameter ≤ 0.30mm 8
2 Holes concentration is slight Maximum hole diameter ≤ 0.50mm 9
3 Holes concentration is relatively-obvious Maximum hole diameter ≤ 0.80mm 10
4 Holes concentration is obvious Maximum hole diameter ≤ 1.20mm 11
5 Holes concentration is relatively-serious Maximum hole diameter ≤ 2.00mm 12
6 Holes concentration is serious Maximum hole diameter > 2.00mm 13
4.2 Microstructure examination criteria
4.2.1 For eutectic aluminum-silicon alloy (sodium-salt modification), the examination is
shown in the 3rd-group pictures; examination description is shown in Table 3.
Table 3
Grade-
level
Examination description of eutectic aluminum-silicon alloy (sodium-salt
modification) microstructure (100x magnification)
Picture
number
1 α-solid solution and eutectic silicon are very tiny, evenly distributed 14
2 α-solid solution is tiny; eutectic silicon is in small-spotty, evenly distributed 15
3 α-solid solution is relatively-tiny; eutectic silicon is in spotty; surrounding of eutectic silicon had occurred metamorphism phenomenon 16
α-solid solution is relatively-large; some eutectic silicon are in short-
strip, some are in spotty; there are small amount of small-chunks (side-
length ≤ 0.09mm) of primary silicon
5 Eutectic silicon are in long-strip; there is no metamorphism 18
α-solid solution is in coarse; eutectic silicon and Al2Cu gather into
chunks, chain-distributed along the grain boundaries; there is over-
burning
4.2.3 For Al-Si-Cu-Mg alloy microstructure, the examination is shown in the 5th-group
pictures; examination description is shown in Table 5.
Table 5
Grade-level Examination description of Al-Si-Cu-Mg alloy microstructure (100x magnification)
Picture
number
1 α-solid solu...
Share
